
Ever heard of a no-bake cake? Let's be honest, not everyone has the dexterity, precision, and nearly perfect conditions required to bake a traditional cake. But for the aspiring pastry chef, there's a solution: the no-bake cake. As the name suggests, you don't have to bake a no-bake cake, but beware, you might need a refrigerator, and some preparations may require heat sources, but absolutely no oven!
But what exactly is the difference between a no-bake cake and a dessert? Well, method of preparation, cooking process, and texture are the keywords to distinguish them.
Here are some nuances:
Method of Preparation:
Dessert: The term "dessert" refers to a wide range of sweet dishes that are often enjoyed as the conclusion of a meal. Desserts can be baked, cooked, frozen, or prepared in other ways.
No-bake cake: As the name indicates, a no-bake cake is made without the need to be baked in an oven. Typically, the ingredients are mixed and set in the refrigerator.
Cooking Process:
Dessert: Desserts can involve various cooking processes, such as baking pies, cakes, cookies, as well as poaching, steaming, boiling, frying, or freezing.
No-bake cake: These cakes are characterized by the absence of a baking process. They are usually prepared by combining ingredients like cookie crumbs, butter, cream cheese, and sweetened ingredients, after which the cake sets in the refrigerator.
Texture:
Dessert: Desserts can have a variety of textures, ranging from airy and soft to crispy and crumbly, depending on the type of dessert.
No-bake cake: No-bake cakes often have a rich and creamy texture because they frequently contain cream cheese, whipped cream, or condensed milk.
In short, while a dessert is a broad concept that includes all sorts of sweet treats, a no-bake cake is a specific type that does not need to be baked and often sets in the refrigerator.
Whatever your reason might be for starting a no-bake cake, rest assured your guests will leave the table asking if you're willing to share the recipe. Good luck and enjoy the baking fun, or rather, the NO-bake fun!
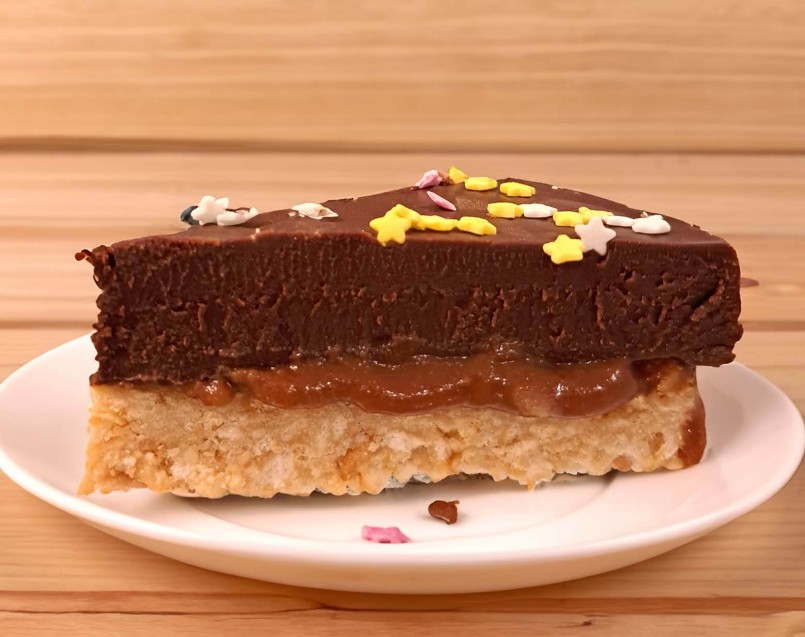
No bake Pie

| Category: | Desserts |
| Cooking Time: | 2 h |
| Portions: |
8
|
| Kitchen: | Belgian Cuisine |
| Cost Range: | Cheap |
Ingredients:
-
150 gr Nic nac cookies
-
130 gr Unsalted butter
-
150 gr Walnuts
-
325 ml Cream
-
75 ml Milk
-
200 gr Granulated sugar
-
400 gr Dark chocolate
Instructions:
Preparation of the Cookie Base
- Crumble the Cookies: Take 150 grams of your favorite cookies and grind them into fine crumbs using a food processor or place them in a bag and use a rolling pin.
- Melt the Butter: Melt 80 grams of butter in a small pan over low heat or in the microwave.
- Combine and Shape: Mix the cookie crumbs with the melted butter until the mixture is well combined. Firmly press this mixture into the bottom of a baking pan lined with parchment paper (preferably a round form of 20 cm diameter or similar). If your cookie dough comes apart too easily? Then add a spoonful of water until it has a consistency that sticks. Allow to set in the fridge for at least an hour.
Preparation of the Caramel Layer
- Make the Caramel: Put 200 grams of sugar in a saucepan and set it over low heat. Let the sugar caramelize to a golden brown color without stirring! You may occasionally redistribute the sugar in the pan by gently shaking it in circular motions. Remove the pan from the heat.
- Add Milk and Cream: Mix 75 milliliters of cream and 75 milliliters of milk, and add them to the caramel. Be careful, as the mixture may bubble vigorously. Stir until everything is completely dissolved. Put the pan back on the fire, add the walnuts that you have chopped in advance, and let the mixture simmer for a few minutes until it thickens.
- Pour over the Cookie Base: Let the caramel cool slightly and pour the caramel layer evenly over the cooled cookie base. Let the whole thing cool and then place it in the refrigerator to further set, preferably for at least 30 minutes.
Preparation of the Chocolate Layer
- Melt the Chocolate: Heat 250 milliliters of cream and add the chocolate broken into pieces and the 50 grams of unsalted butter. Continue stirring without letting it boil, until all the ingredients are dissolved.
- Pour over the Caramel Layer: Pour the melted chocolate over the set caramel layer.
- Let Set: Put the baking form back in the refrigerator and let the whole set, ideally for a few more hours, before cutting it into pieces and serving.